This is an easy to make, delicious Punjabi side dish for chapathi or puri. It is also high in protein/fiber content.
Inactive prep time - 8-10 hrs
Active prep time - 20-30 mins
Ingredients :
Chickpeas / Garbanzo beans / Chole - 16 oz / 500 gms approx [ I used canned beans ]
Onion - 1 medium, chopped finely
Tomato - 2 large, chopped finely
Ginger garlic paste - 1 tbsp
Green chillies - 4 or as per taste
Chole masala - 2 to 3 tbsp [ I used MDH masala, make sure that your chana/ chole masala contains pomegranate seed powder ]
Cumin seeds - 1 tsp
Turmeric - 1/4 tsp
Oil
Salt to taste
Whole spices:
Cloves - 2
Cardamom - 2
Cinnamon stick - 1 inch stick
Bay leaf - 1
Garnishing :
Cilantro - 4 to 5 sprigs, chopped
Onion - as needed, cut into slices
Lime juice - 1 to 2 tbsp or as per taste
Procedure :
Wash and soak the chole overnight for 8- 10 hours. Since I used canned beans I didn't follow this step.
Wash again and pressure cook the chole until soft. [ It should take 5-6 whistles to soften the beans ] . Keep aside .[ If you want the chickpeas to look plump you can add baking soda while pressure cooking ].
In a large wok on medium heat, add oil . Once hot add the cumin seeds, once they start to splutter add the whole spices and stir for few seconds. Add the onions and stir till they turn transparent. Add the ginger-garlic paste and stir again till the onion turn golden brown and the raw smell of ginger - garlic paste goes off.
Add in the tomatoes along with turmeric and salt. Make sure that the heat is on medium and cook till the onion turn real mushy ( i. e without any chunks ) . This should take 10 -12 mins approx on medium to low heat . At this stage add in the chana masala and cook for another 10 mins or till the raw smell of chana masala goes and you get a nice aroma. If you feel that the gravy is getting dry add some water from the boiled chole.
Once you get a nice aroma add the chole and let it boil for 5 mins. Garnish with cilantro , onions and lime juice. Serve hot with poori / bathura.
Note : My mom always adds about 1-2 tbsp of shredded coconut before serving. This addition can be made if you also feel that your chole masala has turned too spicy.
Healthy, egg-less, vegetarian, neo-traditional cooking - tips, recipes and information !
Thursday, September 23, 2010
Saturday, September 18, 2010
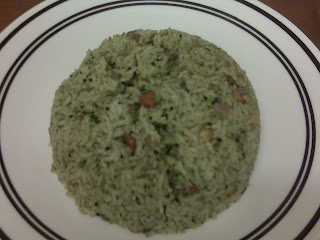
Mint Rice/ Pudina Rice
During weekdays I prefer to cook and eat regular south Indian meals, but in the weekends I look forward to cooking something different. But - weekends also mean lazy days so coupled with constraints of laziness and enthusiasm to eat something different ( Lol.. ) , lead me into creating my own list of comfort foods. Mint rice/ Pudina rice is one among them. Its quite easy to make and yet tastes wonderful and is a pleasant change from regular meals.
Prep time - 10 mins
Cooking time - 10 mins
Ingredients :
Rice - 2 cups
Mint - 2 cups [ Rice : Mint = 1 : 1 ]
Green Chillis - 3 to 4 or as per taste
Coconut - 4 to 5 tbsp, shredded
Ginger - 1 inch stick
Garlic - 2 medium pods
Cashews - 1 to 2 tbsp
Mustard seeds - 1 tsp
Onion - 1 medium, chopped
Salt to taste
Procedure :
Cook rice half an hour prior to cooking . Once cool fluff up the rice with a fork so that the rice morsels don't stick with each other.
Grind mint, green chillies, coconut, garlic, ginger without adding water.
In a pan heat oil , and once hot, add the mustard seeds and let them splutter. Add cashew nuts and stir till they turn golden brown, now add the onions and stir till they become transparent. Add the ground masala and salt. Turn the heat to medium and stir slowly till the raw smell of ginger garlic goes off. [ This should take 5-6 mins approx on medium to low flame].
Now add the rice and mix well. Turn off the heat. Serve hot.
Friday, September 17, 2010
Coconut Chutney
Prep time - 5 mins
Ingredients :
Coconut - 1 cup, shredded
Cilantro / Coriander - 2 to 3 sprigs, chopped
Green chillies - 2 , finely chopped [ or as per taste ]
Roasted chana dal / Chutney dal - 1 tbsp
Cashew nuts - 2 tsp
Tamarind - rolled into a size of a grape or as per taste
Ginger - 1 inch piece, chopped
Cumin seeds / jeera - 1/2 tsp
Water
Salt - as per taste
For the seasoning :
Mustard seeds - 1/2 tsp
Cumin seeds / jeera - 1/2 tsp
Whole red chili - 1to 2 pieces
Asafoetida - 1 to 2 pinches
Curry leaves - 2 to 3
Oil - 2 tsp
Urad dal ( split ) - 1 tsp
Procedure :
Grind all the ingredients ( except those under the seasoning section ) into a fine paste by adding little water. Transfer this fine paste into the serving bowl.
In a small to medium sized wok heat oil. Once hot add the mustard seeds, once they splutter add the cumin seeds and red chillies. Stir quickly and as the cumin seeds crackle add the split urad dal and stir till they turn golden in color. Make sure that you don't burn the seasoning, if the oil gets too hot turn the heat to medium. Now add the asafoetida and turn off the heat. Stir and add the curry leaves. . Pour this mixture over the chutney and mix. Preferably add the seasoning just before serving.
Serve with dosai / idli.
I followed this recipe from vahrevah.com
Ingredients :
Coconut - 1 cup, shredded
Cilantro / Coriander - 2 to 3 sprigs, chopped
Green chillies - 2 , finely chopped [ or as per taste ]
Roasted chana dal / Chutney dal - 1 tbsp
Cashew nuts - 2 tsp
Tamarind - rolled into a size of a grape or as per taste
Ginger - 1 inch piece, chopped
Cumin seeds / jeera - 1/2 tsp
Water
Salt - as per taste
For the seasoning :
Mustard seeds - 1/2 tsp
Cumin seeds / jeera - 1/2 tsp
Whole red chili - 1to 2 pieces
Asafoetida - 1 to 2 pinches
Curry leaves - 2 to 3
Oil - 2 tsp
Urad dal ( split ) - 1 tsp
Procedure :
Grind all the ingredients ( except those under the seasoning section ) into a fine paste by adding little water. Transfer this fine paste into the serving bowl.
In a small to medium sized wok heat oil. Once hot add the mustard seeds, once they splutter add the cumin seeds and red chillies. Stir quickly and as the cumin seeds crackle add the split urad dal and stir till they turn golden in color. Make sure that you don't burn the seasoning, if the oil gets too hot turn the heat to medium. Now add the asafoetida and turn off the heat. Stir and add the curry leaves. . Pour this mixture over the chutney and mix. Preferably add the seasoning just before serving.
Serve with dosai / idli.
I followed this recipe from vahrevah.com
Banana Rye Bread
Banana Rye Bread can be a pleasant change from our regular cereals and breads. Along with the health benefits , this bread tastes good too!
I followed the same recipe of Banana bread and just replaced the all purpose flour with the rye flour. Also I reduced the 1 cup of sugar to approx 3/4th cup of sugar. I felt that I could have reduced the 3 bananas to 2 to get a more rye flavor (thats right, more taste of the rye flour and not of the bananas). If you don't like the rye taste you might want to go ahead with 3 bananas.
Another important thing to note is the baking time. It took me approx 1 hour and 35 mins to bake this bread so it is strongly recommended that you use a dark bread pan as it will absorb more heat and bake faster.
I followed the same recipe of Banana bread and just replaced the all purpose flour with the rye flour. Also I reduced the 1 cup of sugar to approx 3/4th cup of sugar. I felt that I could have reduced the 3 bananas to 2 to get a more rye flavor (thats right, more taste of the rye flour and not of the bananas). If you don't like the rye taste you might want to go ahead with 3 bananas.
Another important thing to note is the baking time. It took me approx 1 hour and 35 mins to bake this bread so it is strongly recommended that you use a dark bread pan as it will absorb more heat and bake faster.
Sunday, September 12, 2010
Eggless Banana Bread
Today 12th Sep 2010 is my parents 35th wedding anniversary. So, on a sweet note, we would like to dedicate this banana bread recipe to their 35 years of togetherness and wishing many many many more to come.From us- A Very Happy Wedding Anniversary to Appa and Amma.
I have added banana bread to my list of favorite breads. This yumilicious bread is easy to prepare. I would also want to try the healthier versions i.e with buckwheat or rye flour soon. Also, I felt that I could reduce the amount of sugar from 1 cup to 3/4th cup ( that is, if you want to eat the bread for breakfast, you can substitute with the healthier flour and add less sugar )
Prep time - 15 mins
Baking time - 50 mins
Ingredients :
All purpose flour - 2 cups
Bananas - 3 ripe, ( I used banana with few brown dots )
Sugar - 1 cup ( I used fine sugar, if not available use powdered sugar )
Flax seed powder- 1 tbsp
Milk - 3 - 4 tbsp
Melted butter - 1/4 cup
Salt - 1 tsp
Baking soda - 1.5 tsp
Procedure :
In a big bowl mix all purpose flour, salt , baking soda and flax seed powder properly.
Mash your bananas with a masher into a fine paste. I mashed the bananas using a big spoon and once they were broken into small pieces I then ground them into a fine paste using a mixer.
To this paste add sugar, milk and butter and mix properly.
Now pour this mix into the all purpose flour mixture slowly and mix slowly. The bread batter would be thicker than usual cake batters. The batter should not be very runny but should be thick enough that you can mix it with ease.
Grease a bread pan and preheat the oven at 350 F. Pour the batter into the pan and bake for 50 mins or till an inserted tooth pick comes out clean.
Friday, September 10, 2010
Uthappam
I usually make Uthappam with the leftoer idli / dosai batter. Though they come out well, I find that they turn hard and dry, as they cool down. My mom suggested I try and make uthappam with a different batter and I tried the same. This is the traditional and conventional recipe! This time they turned out to be real soft and still firm and didn't dry out like before.
Decorating Uthappam is the fun part, you can use carrots, tomatoes, onions, green chillies, cilantro and any other vegetables of your choice! ( the ones that taste good even when they are raw) . D's maternal Paati gave me a very interesting serving tip; she suggested that I try out bite size uthappams. These can be served as an appetizer or as fun food for kids or even adults. Bite size uthappams were a super hit and both me and D loved them.
Inactive prep time - 12-18 hrs
Active prep time - 5-8 mins per uthappam
Ingredients :
For the batter :
Boiled rice - 3 cups
Udat dal - 1 cup
Tuvar dal - 1/2 cup
Fenugreek / methi seeds - 1 tbsp
Salt- 2 and 1/2 tsp salt
For Garnishing :
Onion - cut into 1 inch strips
Tomato - cut into 1 inch strips
Green chillies - as per taste
Cilantro - chopped
Procedure :
Wash and soak all the ingredients under the " for the batter " section for 7-8 hours and grind into a fine and thick batter by adding very little water.
Cover and let the batter to ferment for about 8-10 hours.
Take a griddle on medium heat, pour few drops of oil over it and spread using a tissue or wooden spatula.
Once hot, pour the batter in the centre of the griddle with a large spoon according to your prefered thickness. Let the batter spread and settle into a circular shape. Now, pour little oil on the sides of the uthappam and garnish with the vegetables, cilantro and green chillies. Cook under medium-to-low heat otherwise the insides of the uthappam might not get cooked. Once the lower side turns golden brown in color, then flip the uthappam carefully and let the other side also get cooked. Wait till this side also turns golden brown.
For the bite size uthappams pour the batter over the griddle with a small spoon and garnish with your choice of vegetables. Cook till both the sides are done.
Serve hot with sambar ot chutney.
Wednesday, September 8, 2010
Mutter Paneer
You will definitely relish every bit of this mutter paneer! We had this rich and creamy side dish with chapatis and has become our recent favorite .
I followed this recipe from Sanjay Thumma's video.
Prep Time - 15 -20 mins
Cooking time - 30 mins
Ingredients :
Paneer - 14- 15 cubes ( I made my own masala paneer with kasuri methi )
Peas / mutter - 2 cups
Onion - 1 medium, chopped
Tomatoes - 2 medium, chopped
Green chillies - 3, chopped
Ginger- garlic paste - 1 - 2 tsp
Turmeric - 1/4 tsp
Chilli powder - 1/2 to 3/4 tsp ( or as per taste )
Cumin powder - 1 tsp
Coriander powder - 1 tsp
Cilantro / coriander leaves - 3 to 4 sprigs finely chopped
Kasuri methi - 1 tbsp
Cream - 1 tbsp
Cashews - 1 tsp
Cumin seeds - 1 tsp
Salt - to taste
Whole spices :
Bay leaf - 1
Cloves - 3 - 4
Cardamom - 1
Cinamon stick - 1 inch
Procedure :
Microwave the peas for 2 mins .
In a large wok, heat oil on medium. Fry the cashews till light golden brown, add the chopped onions and fry till golden brown. If you feel that your onions are getting burnt or sticking, add half a tsp of salt as that will create moisture. Once they are golden brown, add turmeric and ginger-garlic paste and saute till the raw smell of ginger - garlic paste goes off. This should take approx 30 - 40 seconds. Now add in the chopped tomatoes and on low to medium heat till the tomatoes turn mushy. Turn off the heat and cool this mixture.
When cool, grind into a fine paste and keep aside. In the same wok, add oil and heat on medium. Add the whole spices and cumin seeds. Once the cumin seeds splutter, add the fine ground paste along with little water, green chillies, salt and stir. Add cumin powder, coriander powder and chilli powder. Stir and cook on low to medium for 10- 15 mins. The mixture will become frothy towards the end of 10th minute. Crush the kasoori methi and add into the boiling gravy and cook again for 10 mins. By this time the gravy would have turned thicker.
Now add the peas and boil again for 5 mins. Add in the paneer pieces and boil for 2-3 minutes. Garnish with cilantro and cream . Stir properly. Turn off the heat. Serve hot with roti or naan.
Friday, September 3, 2010
Authentic Kuzhi paniyaram and 25th post!
Ever wondered like me, why homemade kuzhi paniyarams dont taste like ones served in hotels??? Read on to find out what is to be done !
Inactive prep - 24 hours
Active prep - 10-15 mins
Ingredients :
For the batter :
Boiled rice - 1 cup
Raw rice - 1 cup
Urad dal - 1 cup
Sabudaana / Javvarisi - 1 cup
Semolina / Rava - 1 cup
For garnishing :
Cilantro / coriander chopped
Onions chopped
Seasoning:
Mustard seeds
Urad dal
Oil
Procedure :
Soak all the ingredients under "for the batter " section for 10- 12 hours .
Grind it to a smooth paste. Add salt. Cover and allow it to ferment ( it should take around 6-7 hours for the batter to rise ).
Heat oil in a small pan, add mustard seeds and let them splutter. Add the urad dal and stir till it turns golden brown. Turn off the heat and pour this mixture over the batter , also add the chopped cilantro and onions.
Add about one and a half tsp of oil in the paniyaram griddle holes (or kuzhis!), when hot, add the batter and cook till both the sides turn golden brown .
Serve hot with chutney and sambaar.
Friday, August 27, 2010
Tiramisu (eggless)
Today, 27th August, is my MIL's birthday. D and myself would like to wish her a very very happy birthday and we are grateful for her ever present love and affection and for everything that she represents! We celebrated in absentia the occasion with a homemade eggless Tiramisu and it turned out really tasty! We just wish we were able to share it with her.
The Tiramisu version that I made, is eggless and made with mascorpone cheese. D loves it a lot, and more so because the coffee flavor is his favorite Breakfast blend!
Tiramisu is made with layers of ladyfinger biscuits and a mascarpone- whipped cream mix.And I made the following changes to my Tiramisu from the traditional recipe :
1. I replaced the egg in the mascarpone - whipping cream mixture with custard . Custard, just like eggs would help in firming up the cheese and cream.
2. Instead of using lady finger biscuits ( sponge cake with eggs ) i made my own eggless sponge sheets.
3. The traditional Tiramisu recipe uses dessert liquor ( like Marsala wine, Rum, Brandy, Kahlua ). You can instead use unsweetened grape juice.
I referred to Sanjay Thumma's eggless video for Tiramisu, he has used strained yogurt whereas i made my own mascarpone cheese.
I hereby present the full recipe
Ingredients :
For the sponge cake thin sheets :
All purpose flour - 1 cup
Sweetened condensed milk - 7 ounces /198.5 gms [ half can ]
Melted butter - 1/4 cup
Baking powder - 1 tsp
Baking soda - 1/2 tsp
Water - 1 cup
Heavy whipping cream - 8 ounces / 227 gms
Mascarpone Cheese - Refer the recipe by clicking on it
Strong brewed coffee - 1.5 cups
Unsweetened grape juice - 3 to 4 tbsp
Sugar - as per taste ( i used about 1/4 to 1/2 cup )
Cocoa powder - 1/2 cup ( or more as per taste )
For the custard :
Milk - 1/2 cup
Custard powder - 1 tbsp
For Garnishing:
Cocoa powder
Chocolate ( I used mildly sweet Hershey's dark chocolate )
Procedure :
Sponge cake cookie sheets :
Preheat the oven at 350 F and grease a sheet pan ( cookie tray).
In a small bowl mix melted butter, condensed milk and water.
In another big bowl mix all purpose flour, baking powder and baking soda, make a well in between and pour in the condensed milk - butter mix and mix properly.
Pour this batter on the greased tray and spread evenly so that when its baked , we will get a thin sheet of sponge cake.Take a knife and cut it into small strips ( Similar to the ladyfinger biscuits ).
Mascarpone, whipped cream and custard mixture (MWC mixture) :
How to make whipped cream
Take the heavy whipping cream in a bowl, add a tbsp of sugar and whisk till soft peaks are formed. This should take about 20 mins of heavy whisking.
How to make custard
In a small pan heat milk. Take custard powder and mix it in 3 - 4 tbsp of milk. When the milk comes to a rolling boil add the custard mix and stir continuously till it thickens. This would take few seconds. Cool the custard.
In a big bowl take mascarpone cheese and mix 3-4 tbsp of sugar and whisk till the cheese becomes soft. Add the whipping cream and custard and mix them well till you get a smooth mixture . To this mixture add 2-3 tbsp of brewed coffee. Check for sugar , If you want to make your cheese more sweeter, add some more sugar.
Preparing the coffee liquor:
In a bowl mix the strong brewed coffee and 2-3 tbsp of unsweetened grape juice ( or Wine, Rum or Brandy if using ).
Chocolate Shavings for garnishing:
Take the big bar of dark chocolate and with a vegetable peeler shave off to make the chocolate shavings.
Assembling the cake :
Take a serving bowl ( preferably square or rectangle ) in which we will assemble the Tiramisu layers.
1st layer
Dip the sponge sheets into the coffee liquors ( give a quick dip, like for a second or two. Over dipping would turn the cake soggy and break ) and line them into the serving bowl. Fill out the empty spaces with small pieces of sponge sheets if necessary.
2nd layer
Pour half of the MWC mix over the sponge sheets gently.
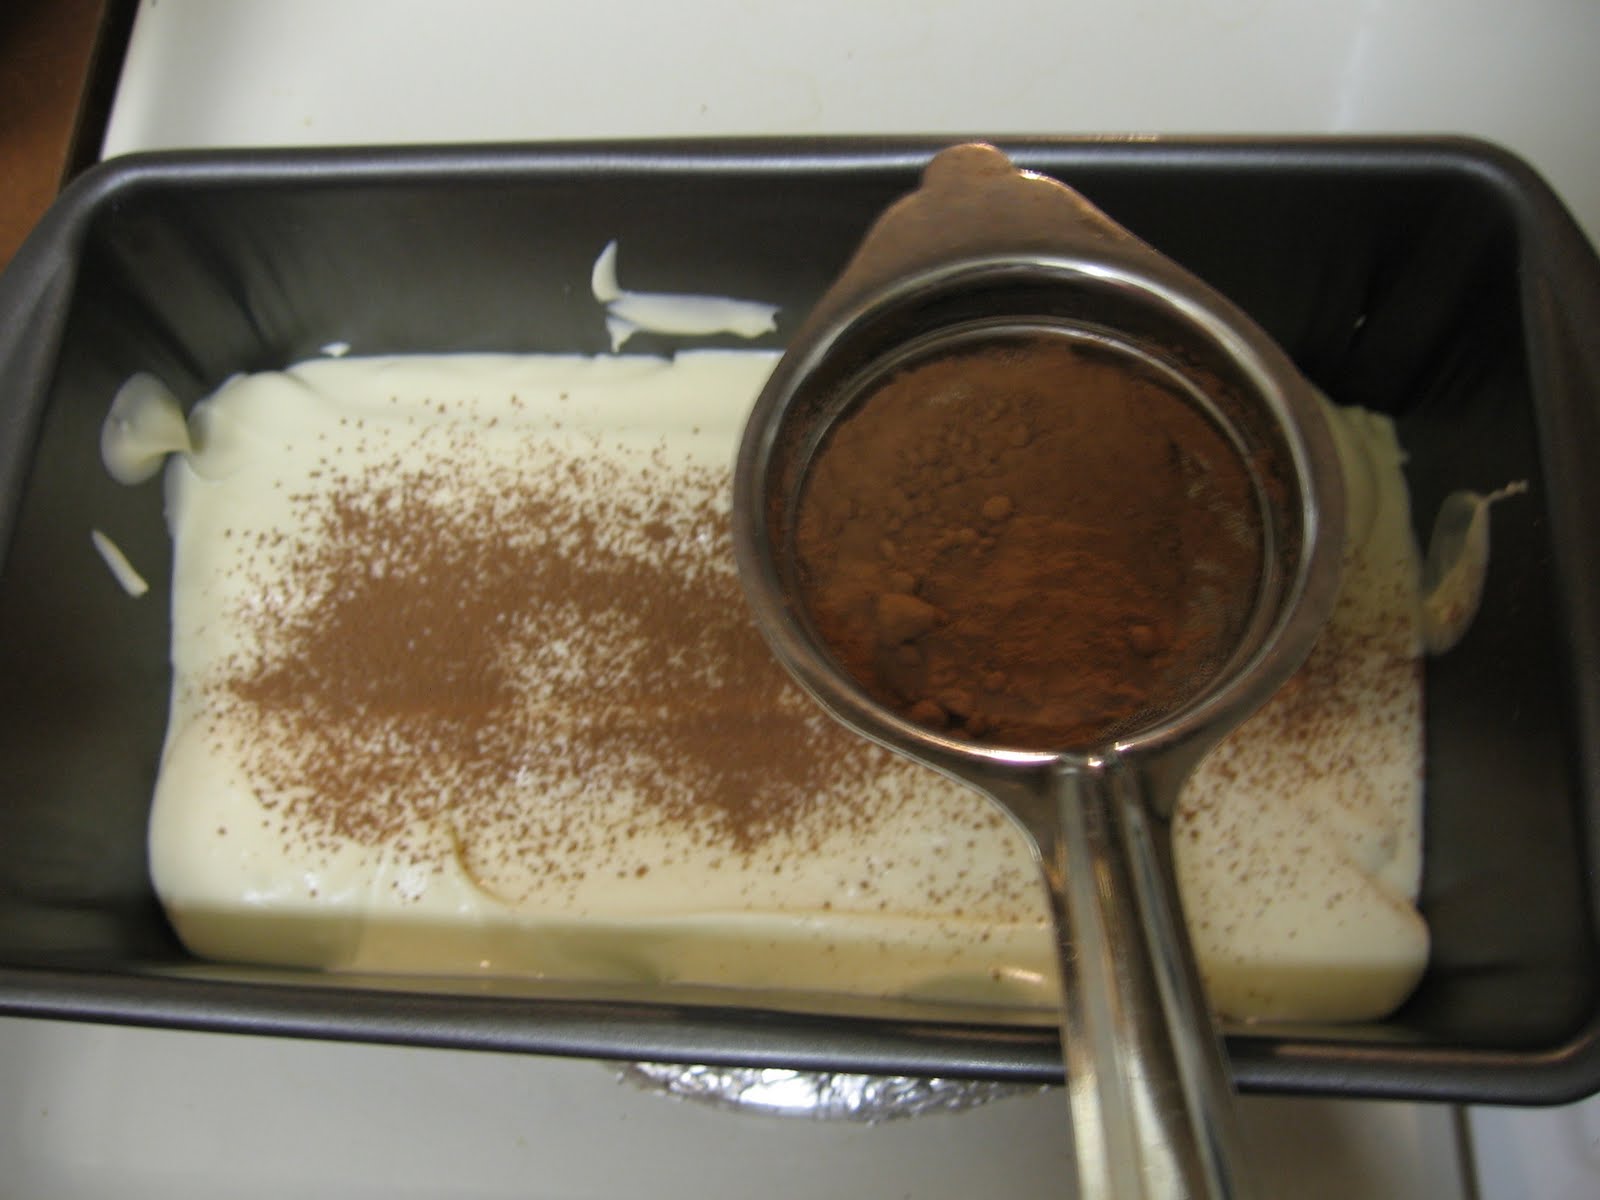
Evenly spread the cocoa powder over the MWC layer with the help of a tea strainer.
3rd layer
Take the sponge sheets and give a quick dip in the coffee liquor and line them over the cocoa powder .
4th layer
Pour some more MWC mix over the sponge sheets.
Sprinkle the cocoa powder over the MWC layer with the help of a tea strainer and decorate with chocolate shavings.
Cover with a saran wrap ( plastic wrap ) and refrigerate for 6-7 hours.
Serve chilled . Cutting and serving the tiramisu can be little tricky as the cake is very spongy and creamy. So cut carefully and serve.
Happy b'day again to my mother-in-law!!!!
Wednesday, August 25, 2010
Mascarpone Cheese (for Tiramisu)
Mascarpone Cheese is used mainly in Italian cooking and is most famously used in Tiramisu and other deserts.

It is made mainly from heavy whipping cream and lemon juice or tartaric acid. I looked through various websites to make mascarpone cheese, all of them recommended using pasteurized heavy whipping cream.But when I went looking for it I was able to find ultra pasteurized whipping cream ( not pasteurized whipping cream ) and decided to go ahead with it ( as few websites said it was okay to use ultra pasteurized whipping cream for the same ). It was also recommended to use a cooking thermometer to check the heat, it should not be a problem if you don't have one.
Just like how paneer ( cottage cheese) is made, the main ingredient (in the case of mascarpone cheese it is heavy whipping cream whereas for paneer it is whole milk), is curdled with lime juice. And the similarity ends there because when you curdle the milk in paneer we can see the paneer and whey seperating immediately whereas in mascarpone cheese, when the whipping cream is curdled, we hardly see any significant difference except for the thickening of the cream. You will understand it seeing the pictures shown and described below.

3. Firming:
Pour the curdled cream over the cloth ( the four layers of cloth would prevent the cream from flowing immediately and would eventually filter the whey ) Do not squeeze or press the cloth. Place the colander along with the cream over a plate ( to prevent the whey from dripping all over) and cover the colander with a plastic wrap (saran wrap).

Place it in a refrigerator for atleast 12 hours and only after minimum 12 hours would the cheese firm up completely.
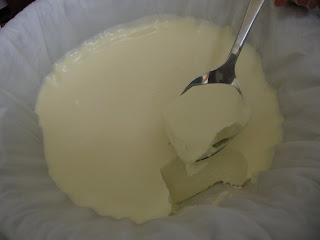
There would be a very little whey in the plate. You would get a firm and creamy cheese.

The cheese should be refrigerated until used and should be used within 3-4 days.
It is made mainly from heavy whipping cream and lemon juice or tartaric acid. I looked through various websites to make mascarpone cheese, all of them recommended using pasteurized heavy whipping cream.But when I went looking for it I was able to find ultra pasteurized whipping cream ( not pasteurized whipping cream ) and decided to go ahead with it ( as few websites said it was okay to use ultra pasteurized whipping cream for the same ). It was also recommended to use a cooking thermometer to check the heat, it should not be a problem if you don't have one.
Just like how paneer ( cottage cheese) is made, the main ingredient (in the case of mascarpone cheese it is heavy whipping cream whereas for paneer it is whole milk), is curdled with lime juice. And the similarity ends there because when you curdle the milk in paneer we can see the paneer and whey seperating immediately whereas in mascarpone cheese, when the whipping cream is curdled, we hardly see any significant difference except for the thickening of the cream. You will understand it seeing the pictures shown and described below.
It might take more or less time than described here to make mascarpone cheese.
Active prep - 20 - 25 min
Inactive prep - 12 hrs
Ingredients :
Heavy Whipping cream ( Organic ultra pasteurized ) - 2 packs, 16 ounces / 454 gm ( 8 ounces / 227 gm each )
Lemon juice - 1 tbsp ( you can also use vinegar )
Other things required :
Cheese cloth - 4 nos ( I used 4 nos of clean men's handkerchief )
Colander
Cooking thermometer ( I didn't use this )
One large skillet
One strong bottomed, heat resistant cooking bowl
Procedure:
1. Double Boiling:
In a large skillet on medium heat, fill about one inch of water and heat till the water comes to a rolling boil.
Turn the heat from medium to low. Transfer the heavy whipping cream into the heavy bottomed cooking bowl. And place this bowl over the skillet. ( Take out some water from the skillet if it spills after the bowl is placed )
2. Boiling and Curdling:
Take a wooden spoon and keep stirring once in a while, you will notice that a very light coating of milk remains on the back of the wooden spoon.
Keep stirring the cream till the whipping cream reaches a temperature of 190 F, since I did not use a cooking thermometer I waited till small bubbles started forming on the surface of the cream.
This should approx take 20- 25 minutes of gentle heating. once you see small bubbles forming on the surface add the lemon juice .
After few minutes of stirring , the cream would thicken a little ( as thick as say condensed milk ).
![]() |
When the back of the wooden spoon is covered with a thick layer of curdled cream, turn of the heat and cool the curdled cream for about 20 - 25 minutes.Take a colander and place the four pieces of men's handerkerchief over it.
3. Firming:
Pour the curdled cream over the cloth ( the four layers of cloth would prevent the cream from flowing immediately and would eventually filter the whey ) Do not squeeze or press the cloth. Place the colander along with the cream over a plate ( to prevent the whey from dripping all over) and cover the colander with a plastic wrap (saran wrap).
Place it in a refrigerator for atleast 12 hours and only after minimum 12 hours would the cheese firm up completely.
There would be a very little whey in the plate. You would get a firm and creamy cheese.
The cheese should be refrigerated until used and should be used within 3-4 days.
Subscribe to:
Posts (Atom)