Tuesday, September 28, 2010

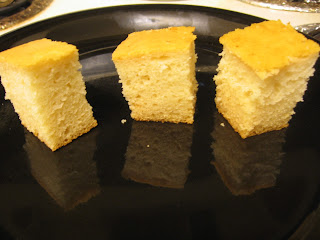
Eggless Milk Powder Cake

Today 28th September, is my Dad's birthday. Here is a birthday wish that comes with lots of love, warmth and heartfelt thanks for all that he has done for me. A very very Happy Birthday Appa - from D and me.
We celebrated my Dad's birthday ( in absentia! ) with an egg less milk powder cake. I specially loved this cake for it close resemblance with the taste of white milk chocolate.


D's mom shared this simple yet tasty recipe with me. The next time I try this cake, I would want to add tutti- fruity or chocolate chips for an extra flavor. Also I usually add vinegar to all my cakes but I didn't add this time, as I was using a lot of milk, I didn't want to curdle it. ( I am not sure if cold milk can be curdled by vinegar, I didn't want to take any chances !) . I have used only 1/2 cup of butter and used an extra 1/4 cup of milk to get the perfect batter. You can substitute the 1/4 cup milk with extra butter also.


Prep Time - 15 mins
Baking time - 30 - 40 mins

Ingredients :

All purpose flour / Maida - 2 cups
Milk powder - 1 cup
Milk - 1 cup + 1/4 cup
Baking powder - 2 tsp
Baking soda - 1 tsp
Vanilla essence - 1 tsp
Sugar - 1 cup  ( I used fine sugar, if not available use powdered sugar )
Melted butter - 1/2 cup
Salt - 1/4 tsp

Procedure :

Pre heat the oven at 350 F and grease your baking dish.

In a big bowl, mix all purpose flour, salt, baking powder and baking soda properly.

In another bowl, mix the melted butter and sugar. Similarly mix the milk and milk powder in a bowl and make sure that the milk powder dissolves completely without any lumps remaining. Add this into the butter-sugar mix. Stir all this properly. Since I used fine sugar I kept doing it till the sugar dissolved completely. To this also add vanilla essence. Give it one final mix and keep aside.

Take the big bowl with all purpose flour / maida and make a well in the center and gradually pour the above mix and stir slowly till you get a smooth batter without lumps. Don't use a hand mixer, just stir everything with a large spoon. Over mixing an eggless batter will cause the cake to deflate after it is baked.

Pour the batter into the baking pan and bake for 30 mins or till an inserted toothpick / knife comes out clean.

Happy B'day Daddy!!

Saturday, September 25, 2010

Kadhai Bhindi

One of oldest memories of kadhai vegetables I have is from the winter wedding  parties, where the server would have different vegetables on one side of a large skillet and the kadhai masala on the other side.I would go and tell him my choice of vegetables ( which apparently were potato, carrots and peas most of the time) and he would mix the vegetables, masalas and flip them fancily in air once they were done. Somehow I still happen to remember the taste of kadhai vegetables and thought I would give it a try. Even though I am not a great fan of Okra / bhindi / lady fingers, I thought eating kadhai bhindi would make me like bhindi. It did work finally!

The recipe is as follows:


Prep time - 10 mins
Cooking time - 30 mins

Ingredients:

Okra / bhindi / ladyfingers - 2 cups, cut into 1 inch piece.
Capsicum / bell pepper - 1 medium , cut into 1 inch piece
Onion - 1 medium, chopped
Tomato - 2 medium, chopped
Ginger garlic paste - 1 tbsp
Coriander seeds - 1 tbsp, crushed coarsely
Cumin powder - 1 tsp
Coriander powder - 1 tsp
Cumin seeds - 1 tsp
Green chillies - 3 to 4, slit [ or as per taste ]
Chili powder - 1/2 to 3/4 tsp 
Turmeric - 1/4 tsp
Salt - as per taste
Oil - 4 to 5 tbsp
Garam masala - 1/2 to 1 tsp [ or as per taste ]
Cilantro - 4 to 5 sprigs
Lime juice - 1 tsp

Procedure :

Cooking kadhai bhindi is a bit tricky as bhindi / okra has a tendency to get slimy/gooey when cooked. And to prevent that, I cooked it separately.

In a pan on medium heat, heat oil. Add the okra / bhindi and pan-fry till they loose all the slime and get 70% cooked. I also added some lime juice to the okra ( as it helps in loosing the slime faster ) . Also do not add too much of lime juice as the okra would turn sour.

Once done, keep the fried okra aside and drain the excess oil. 

In the same oil ( on medium heat ) add the cumin seeds, wait till they splutter and then add the crushed coriander seeds. Add the onions and stir till they turn transparent. At this stage, add the turmeric and ginger-garlic paste and stir again till the raw smell of ginger-garlic goes off. This should take a minute or less. Now, add the tomatoes, green chillies and cook till the tomatoes turn little mushy. Make sure that the heat is between medium to low. 
Now add the cumin powder, coriander powder and chili powder and again cook till the tomatoes are real mushy and ooze out oil. This should take 3-4 mins on low heat. At this heat level, the tomatoes without adding any extra water shouldn't get burnt, but if you still feel it might, sprinkle very little water.

Add in the bell peppers / capsicum and cook covered  for 4-5 mins , stir and add the cilantro and again cook for a minute. Now add the pan fried okra, stir and cook covered for 3-4 minutes.

Sprinkle the garam masala and turn off the heat. Serve hot.


Thursday, September 23, 2010

Chole / Chana Masala

This is an easy to make, delicious Punjabi side dish for chapathi or puri. It is also high in protein/fiber content.


Inactive prep time - 8-10 hrs
Active prep time - 20-30 mins

Ingredients :

Chickpeas / Garbanzo beans / Chole - 16 oz / 500 gms approx [ I used canned beans ]
Onion - 1 medium, chopped finely
Tomato - 2 large, chopped finely
Ginger garlic paste - 1 tbsp
Green chillies - 4 or as per taste
Chole masala - 2 to 3 tbsp [ I used MDH masala, make sure that your chana/ chole masala contains pomegranate seed powder ]
Cumin seeds - 1 tsp
Turmeric - 1/4 tsp
Oil
Salt to taste

Whole spices:

Cloves - 2
Cardamom - 2
Cinnamon stick - 1 inch stick
Bay leaf - 1

Garnishing :

Cilantro - 4 to 5 sprigs, chopped
Onion - as needed, cut into slices
Lime juice - 1 to 2 tbsp or as per taste

Procedure :

Wash and soak the chole overnight for 8- 10 hours. Since I used canned beans I didn't follow this step.

Wash again and pressure cook the chole until soft. [ It should take 5-6 whistles to soften the beans ] . Keep aside .[ If you want the chickpeas to look plump you can add baking soda while pressure cooking ].

In a large wok on medium heat, add oil . Once hot add the cumin seeds, once they start to splutter add the whole spices and stir for few seconds. Add the onions and stir till they turn transparent. Add the ginger-garlic paste and stir again till the onion turn golden brown and the raw smell of ginger - garlic paste goes off.

Add in the tomatoes along with turmeric and salt. Make sure that the heat is on medium and cook till the onion turn real mushy ( i. e without any chunks ) . This should take 10 -12 mins approx on medium to low heat . At this stage add in  the chana masala  and  cook for another 10 mins or till the raw smell of chana masala goes and you get a nice aroma. If you feel that the gravy is getting dry add some water from the boiled chole.

Once you get a nice aroma add the chole and let it boil for 5 mins. Garnish with cilantro , onions and lime juice. Serve hot with poori / bathura.

Note : My mom always adds about 1-2 tbsp of shredded coconut before serving. This addition can be made if you also feel that your chole masala has turned too spicy.

Saturday, September 18, 2010

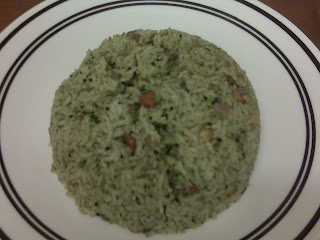
Mint Rice/ Pudina Rice

During weekdays I prefer to cook and eat regular south Indian meals, but in the weekends I look forward to cooking something different. But - weekends also mean lazy days so coupled with constraints of laziness and enthusiasm to eat something different ( Lol.. ) , lead me into creating my own list of comfort foods. Mint rice/ Pudina rice is one among them. Its quite easy to make and yet tastes wonderful and is a pleasant change from regular meals.


Prep time - 10 mins
Cooking time - 10 mins

Ingredients :

Rice - 2 cups
Mint - 2 cups [ Rice : Mint = 1 : 1 ]
Green Chillis - 3 to 4 or as per taste
Coconut - 4 to 5 tbsp, shredded
Ginger - 1 inch stick
Garlic - 2 medium pods
Cashews - 1 to 2 tbsp
Mustard seeds - 1 tsp
Onion - 1 medium, chopped
Salt to taste

Procedure :

Cook rice half an hour prior to cooking . Once cool fluff up the rice with a fork so that the rice morsels don't stick with each other.

Grind mint, green chillies, coconut, garlic, ginger without adding water.

In a pan heat oil , and once hot, add the mustard seeds and let them splutter. Add cashew nuts and stir till they turn golden brown, now add the onions and stir till they become transparent. Add the ground masala and salt. Turn the heat to medium and stir slowly till the raw smell of ginger garlic goes off. [ This should take 5-6 mins approx on medium to low flame].

Now add the rice and mix well. Turn off the heat. Serve hot.

Friday, September 17, 2010

Coconut Chutney

Prep time - 5 mins

Ingredients :

Coconut - 1 cup, shredded
Cilantro / Coriander - 2 to 3 sprigs, chopped
Green chillies - 2 , finely chopped [ or as per taste ]
Roasted  chana dal / Chutney dal - 1 tbsp
Cashew nuts - 2 tsp
Tamarind - rolled into a size of a grape or as per taste
Ginger - 1 inch piece, chopped
Cumin seeds / jeera - 1/2 tsp
Water
Salt - as per taste

For the seasoning :

Mustard seeds - 1/2 tsp
Cumin seeds / jeera - 1/2 tsp
Whole red chili - 1to 2 pieces
Asafoetida - 1 to 2 pinches
Curry leaves - 2 to 3
Oil - 2 tsp
Urad dal ( split ) - 1 tsp

Procedure :

Grind all the ingredients ( except those under the seasoning section ) into a fine paste by adding little water. Transfer this fine paste into the serving bowl.

In a small to medium sized wok heat oil. Once hot add the mustard seeds, once they splutter add the cumin seeds and red chillies.  Stir quickly and as the cumin seeds crackle add the split urad dal  and stir till they turn golden in color. Make sure that you don't burn the seasoning, if the oil gets too hot turn the heat to medium. Now add the asafoetida and turn off the heat. Stir and add the curry leaves. . Pour this mixture over the chutney and mix. Preferably add the seasoning just before serving.
Serve with dosai / idli.

I followed this recipe from vahrevah.com

Banana Rye Bread

Banana Rye Bread can be a pleasant change from our regular cereals and breads. Along with the health benefits , this bread tastes good too!


I followed the same recipe of Banana bread and just replaced the all purpose flour with the rye flour. Also I reduced the 1 cup of sugar to approx 3/4th cup of sugar. I felt that I could have reduced the 3 bananas to 2 to get a more rye flavor (thats right, more taste of the rye flour and not of the bananas). If you don't like the rye taste you might want to go ahead with 3 bananas. 

Another important thing to note is the baking time. It took me approx 1 hour and 35 mins to bake this bread so it is strongly recommended that you use a dark bread pan as it will absorb more heat and bake faster.

Sunday, September 12, 2010

Eggless Banana Bread

Today 12th Sep 2010 is my parents 35th wedding anniversary. So, on a sweet note, we would like to dedicate this banana bread recipe to their 35 years of togetherness and wishing many many many more to come.From us- A Very Happy Wedding Anniversary to Appa and Amma.


I have added banana bread to my list of favorite breads. This yumilicious bread is easy to prepare. I would also want to try the healthier versions i.e with buckwheat or rye flour soon. Also, I felt that I could reduce the amount of sugar from 1 cup to 3/4th cup ( that is, if you want to eat the bread for breakfast, you can substitute with the healthier flour and add less sugar )


Prep time - 15 mins
Baking time - 50 mins

Ingredients :

All purpose flour - 2 cups
Bananas - 3 ripe, ( I used banana with few brown dots )
Sugar - 1 cup ( I used fine sugar, if not available use powdered sugar )
Flax seed  powder- 1 tbsp
Milk - 3 - 4 tbsp
Melted butter - 1/4 cup
Salt - 1 tsp
Baking soda - 1.5 tsp

Procedure :

In a big bowl mix all purpose flour, salt , baking soda and flax seed powder properly.

Mash your bananas with a masher into a fine paste. I mashed the bananas using a big spoon and once they were broken into small pieces I then ground them into a fine paste using a mixer.

To this paste add sugar, milk and butter and mix properly.

Now pour this mix into the all purpose flour mixture slowly and mix slowly. The bread batter would be thicker than usual cake batters. The batter should not be very runny but should be thick enough that you can mix it with ease.

Grease a bread pan and preheat the oven at 350 F. Pour the batter into the pan and bake for 50 mins or till an inserted tooth pick comes out clean.

Friday, September 10, 2010

Uthappam

I usually make Uthappam with the leftoer idli / dosai batter. Though they come out well, I find that they turn hard and dry, as they cool down. My mom suggested I try and make uthappam with a different batter and I tried the same. This is the traditional and conventional recipe! This time they turned out to be real soft and still firm and didn't dry out like before.


Decorating Uthappam is the fun part, you can use carrots, tomatoes, onions, green chillies, cilantro and any other vegetables of your choice! ( the ones that taste good even when they are raw) . D's maternal Paati  gave me a very interesting serving tip; she suggested that I try out bite size uthappams. These can be served as an appetizer or as fun food for kids or even adults. Bite size uthappams were a super hit and both me and D loved them.


Inactive prep time - 12-18 hrs
Active prep time - 5-8 mins per uthappam

Ingredients :

For the batter :

Boiled rice - 3 cups
Udat dal - 1 cup
Tuvar dal - 1/2 cup
Fenugreek / methi seeds - 1 tbsp
Salt- 2 and 1/2 tsp salt

For Garnishing :

Onion - cut into 1 inch strips
Tomato - cut into 1 inch strips
Green chillies - as per taste
Cilantro - chopped

Procedure :

Wash and soak all the ingredients under the " for the batter " section for 7-8 hours and grind into a fine and thick batter by adding very little water.

Cover and let the batter to ferment for about 8-10 hours.

Take a griddle on medium heat, pour few drops of oil over it and spread using a tissue or wooden spatula.
Once hot, pour the batter in the centre of the griddle with a large spoon according to your prefered thickness. Let the batter spread and settle into a circular shape. Now, pour little oil on the sides of the uthappam and garnish with the vegetables, cilantro and green chillies. Cook under medium-to-low heat otherwise the insides of the uthappam might not get cooked. Once the lower side turns golden brown in color, then flip the uthappam carefully and let the other side also get cooked. Wait till this side also turns golden brown.


For the bite size uthappams pour the batter over the griddle with a small spoon and garnish with your choice of vegetables. Cook till both the sides are done.

Serve hot with sambar ot chutney.

Wednesday, September 8, 2010

Mutter Paneer

You will definitely relish every bit of this mutter paneer! We had this rich and creamy side dish with chapatis and has become our recent favorite . 


I followed this recipe from Sanjay Thumma's video.


Prep Time - 15 -20 mins
Cooking time - 30 mins

Ingredients :

Paneer - 14- 15 cubes ( I made my own masala paneer with kasuri methi )
Peas / mutter - 2 cups
Onion - 1 medium, chopped
Tomatoes - 2 medium, chopped
Green chillies - 3, chopped
Ginger- garlic paste - 1 - 2 tsp
Turmeric - 1/4 tsp
Chilli powder - 1/2 to 3/4 tsp ( or as per taste )
Cumin powder - 1 tsp
Coriander powder - 1 tsp
Cilantro / coriander leaves - 3 to 4 sprigs finely chopped
Kasuri methi - 1 tbsp
Cream - 1 tbsp
Cashews - 1 tsp
Cumin seeds - 1 tsp
Salt - to taste

Whole spices :

Bay leaf - 1
Cloves - 3 - 4
Cardamom - 1
Cinamon stick - 1 inch

Procedure :

Microwave the peas for 2 mins .

In a large wok, heat oil on medium. Fry the cashews till light golden brown, add the chopped onions and fry till golden brown. If you feel that your onions are getting burnt or sticking, add half a tsp of salt as that will create moisture. Once they are golden brown, add turmeric and ginger-garlic paste and saute till the raw smell of ginger - garlic paste goes off. This should take approx 30 - 40 seconds. Now add in the chopped tomatoes and on low to medium heat till the tomatoes turn mushy. Turn off the heat and cool this mixture.

When cool, grind into a fine paste and keep aside. In the same wok, add oil and heat on medium. Add the whole spices  and cumin seeds. Once the cumin seeds splutter, add the fine ground paste along with little water, green chillies, salt and stir. Add cumin powder, coriander powder and chilli powder. Stir and cook on low to medium for 10- 15 mins. The mixture will become frothy towards the end of 10th  minute. Crush the kasoori methi and add into the boiling gravy and cook again for 10 mins. By this time the gravy would have turned thicker.

Now add the peas and boil again for 5 mins. Add in the paneer pieces and boil for 2-3 minutes. Garnish with cilantro and cream . Stir properly. Turn off the heat. Serve hot with roti or naan.

Friday, September 3, 2010

Authentic Kuzhi paniyaram and 25th post!

 Ever wondered like me, why homemade kuzhi paniyarams dont taste like ones served in hotels??? Read on to find out what is to be done !


Inactive prep - 24 hours
Active prep - 10-15 mins

Ingredients :

For the batter :

Boiled rice - 1 cup
Raw rice - 1 cup
Urad dal - 1 cup
Sabudaana / Javvarisi - 1 cup
Semolina / Rava - 1 cup

For garnishing :

Cilantro / coriander chopped
Onions chopped

Seasoning:

Mustard seeds
Urad dal
Oil

Procedure :

Soak all the ingredients under "for the batter " section for 10- 12 hours .


Grind it to a smooth paste. Add salt. Cover and allow it to ferment ( it should take around 6-7 hours for the batter to rise ).

Heat oil in a small pan, add mustard seeds and let them splutter. Add the urad dal and stir till it turns golden brown. Turn off the heat and pour this mixture over the batter , also add the chopped cilantro and onions.

Add about one and a half tsp of oil in the paniyaram griddle holes (or kuzhis!), when hot, add the batter and cook till both the sides turn golden brown .

Serve hot with chutney and sambaar.